Having made attempts to import the recorded MXF/P2 MXF files generated by a Panasonic camcorder to Final Cut Pro X for further editing only to find that this editing program failed to recognize MXF/P2 MXF video files?

People who use P2 camcorders like a Panasonic AG-HPX173MC/AG-HPX260MC or other cameras may face the same MXF import issue. The popular and best way to solve this problem once and for all nowadays is adopting a MXF to FCP X video converter to transcode the MXF recordings to Apple ProRes - a compatible video format for FCP X. Pavtube iMixMXF(best Mac MXF Converter Review) is an all powerful conversion tool designed to handle MXF video files to output video formats not only supported by NLEs like FCP X but also by different devices. The most remarkable feature of this MXF to FCP X video converter is to output multi-track Apple Prores MOV, which is the best editing video format for FCP X. In addition to Panasonic P2 MXF files, this conversion program can also handle MXF files captures with Sony XDCAM/XAVC or Canon C300/C500/XF-AVC
How to put MXF/P2 MXF to Final Cut Pro X for free editing?
Step 1. Add MXF/P2 MXF
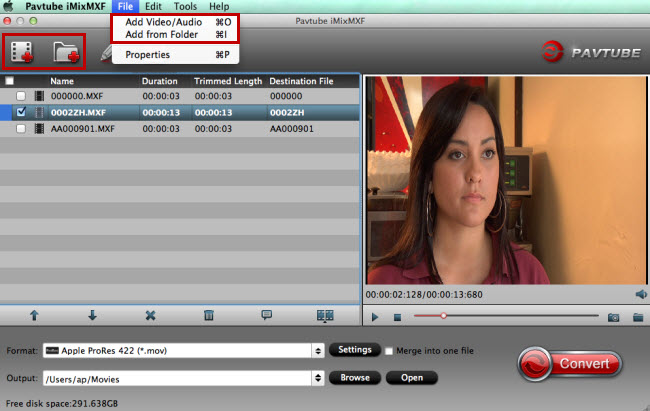
Run MXF to FCP X video converter on Mac and click “File” on the menu bar or the file icons on the tool bar to import MXF/P2 MXF recordings. For P2 MXF, please make sure that a complete and entire MXF structure is well saved in your camcorder’s P2 card.

Step 2. Choose FCP X fully supported format
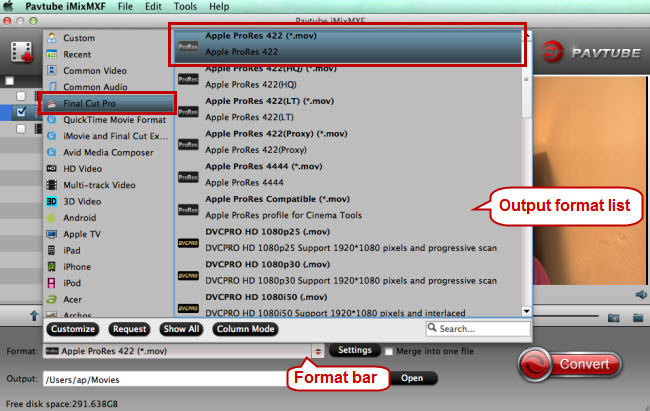
Click the format bar on the main UI to go to the output format list where you can find various audio and video formats suitable for different devices and editing tools. As is known to all, Apple ProRes is the FCP X-supported video format. Click “” and “” to determine the final output format for FCP X and here Apple ProRes 422 is just enough for you.

Step 3. Edit MXF/P2 MXF before conversion (Optional)
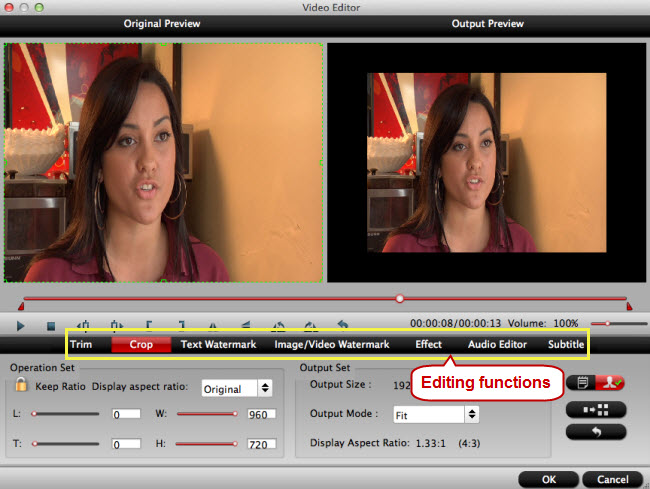
This MXF to FCP X video converter is also designed to edit MXF recordings. Click “Edit” on menu bar or the pencil icon on tool bar to switch to the editing interface where you’re allowed to edit MXF recordings through trimming, cropping, adding watermarks/subtitles, etc before conversion.

Step 4. Start conversion from MXF/P2 MXF to Apple ProRes
Click “Convert” button to convert MXF/P2 MXF to FCP X compatible format “Apple ProRes 422 (*.mov).”
Step 5. Import the converted MXF/P2 MXF
Run FCP X on Mac, and click “File” > “Import” to add the converted MXF/P2 MXF files which have been in Apple ProRes format.
If you don’t want to preserve multiple audio tracks/channels for the output, Pavtube MXF Converter for Mac is also a good choice to convert your MXF/P2MXF files.


