What is interlaced video?
Interlaced video is a technique for doubling the perceived frame rate of a video display without consuming extra bandwidth. The interlaced signal contains two fields of a video frame captured at two different times.
Interlacing problems
Interlaced video is designed to be captured, stored, transmitted, and displayed in the same interlaced format. Because each interlaced video frame is two fields captured at different moments in time, interlaced video frames can exhibit motion artifacts known as interlacing effects, or combing, if recorded objects move fast enough to be in different positions when each individual field is captured. These artifacts may be more visible when interlaced video is displayed at a slower speed than it was captured, or in still frames.

What is progressive scan?
Progressive scan (alternatively referred to as noninterlaced scanning) is a way of displaying, storing and transmitting moving images in which all the lines of each frame are drawn in sequence. And the main advantage with progressive scan is that motition appears smoother and more realistic. Frames have no interlace artifacts and can be captured for use as still photos.
Why need to deinterlace interlaced video into progressive form?
Most cathode ray tube computer monitors, all LCD computer monitors and most HDTVs only work in deinterlace mode, because they are fixed-resolution displays and only support progressive scan. When you display an interlaced video on a progressive scan monitors, which scan lines of an image consecutively, the artifacts will become noticeable. To remove those annyoing artifacts, it would be much ideal for you to convert the interlace video into progressive form.
Most modern displays, such as LCD, DLP and plasma displays, only work in deinterlace mode, because they are fixed-resolution displays and only support progressive scan. In order to display interlaced signal on such displays, the two interlaced fields must be combined into one progressive frame with a deinterlacing process. To deinterlace the video, there are 3 free, simple and effective methods to remove the saw tooth type edge distortion below.
Best tool to deinterlace interlace video into progressive form
It won't be difficult for you to find some free programs such as VirtualDub, Handbrake, VLC, Avidemux, etc to complete the job. However, if you are looking for a simple but advanced media deinterlacing tool, we highly recommend Pavtube Video Converter Ultimate to you, the program not only helps to deinterlace interlace digital video, but also commercial Blu-ray/DVD disc with complicated copy protection and region code limitation. The friendly and easy navigate interface will guide to you finish the whole deintelacing process just just few steps under the "Effect" tab in the "Video Editor" window.
Besides deinterlacing video, the program also offer other beneficial video editing functions for you. You can trim or cut video to remove unwanted parts or segments, split large video into small clips by file size, count or length, merge separate video into one file, crop video to remove the black borders or unwanted area, add video/image/transparent text watermark to video, flip or rotate video horizontally, vertically, clockwise or counterclockwise, apply special rendering effect to video, change video brightness, contrast, saturation, etc, remove/replace audio in video, insert external srt/ass/ssa subtitle to video.
For Mac users, you can fix Blu-ray/DVD/video interlaced issue by downloading Pavtube iMedia Converter for Mac on Mac OS X El Capitan or macOS Sierra.
Step by Step to Deinterlace Interlace Video into Progressive Form
Step 1: Load interlaced digital video or Blu-ray/DVD disc into the program.
Download the install the program on your computer, click "File" > "Add Video/Audio" button to import interlaced digital video into the program. For loading Blu-ray or DVD disc, insert your interlaced Blu-ray/DVD disc into your computer's optical drive, then click "File" > "Load from disc" to load DVD disc into the program. For loading Blu-ray disc, there must be an external Blu-ray drive.

Step 2: Define an output file format.
From "Format" drop-down list, select one of your desired file formats or device and program preset profile formats according to your own needs. If you do not want to re-encode the video, just select to output the same format as the original file format, also make sure do not change any profile settings for the output video.

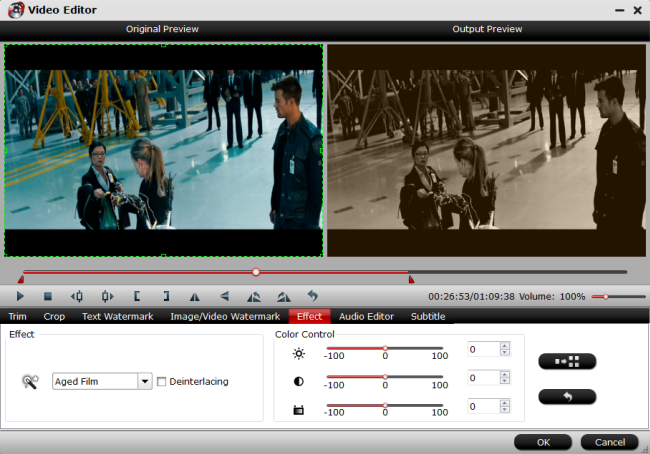
Step 3: Deinterlace video into progressive form.
Select an item on the main interface to activate the "Edit" menu, then click the "Edit" icon on the tool bar to open the "Video Editor" window, switch to the "Effect" tab, tick off "Deinterlacing" option to transform the interlaced video into a progressive form without any artifacts.
Step 4: Complete the video deinterlacing process.
After all settings is over, hit right-bottom "Convert" button to start the interlace video deinterlacing process.
When the conversion is completed, you can get a progressive video for better displaying on most new computers and HDTV.


