When you finish editing your project in iMovie and want to export as a movie for sharing or playback. You may wonder what advanced tips need paying attention to. Here this article will include how to finalize project from iMovie, export iMovie video in different formats and upload iMovie video online.

What does "Finalize iMovie project" mean?
This step mean that you will let iMovie prepares the movies in all of the possible sizes for uploading online or sharing on video sharing sites,etc. The quality like Medium, large, HD will all be rendered. After rendering, iMovie will not open those files for you, but will open in your default media player.
If you finalize a project before you share the project, iMovie won't ask you to choose the file size when you share the project since iMovie has set the videos settings for you. Here are several steps you can follow with to finalize iMovie projects.
Finalize iMovie project
Step 1. Select a completed project to finalize
In the Project Library, choose a finished project to finalize because after you finalize the project in iMovie, if you make any change to the file, then this finalized version will be discarded.
Step 2. Finalize the project
Click the "File";>";Finalize Project" in the main menu to start to finalize iMovie project. The time it takes to convert may depend on the file size of your project and your computer equipment.
The progress finishes when the finalizing dialog disappears.
Export iMovie project to different formats
After completing editing your iMovie files and export your files, you can go to "Share";>";Export using QuickTime" to burn them into DVD. But after checking the iMovie exporting format page, you can find that the output format is very limited, therefore you can't take full advantage of your generated videos for entertainment.
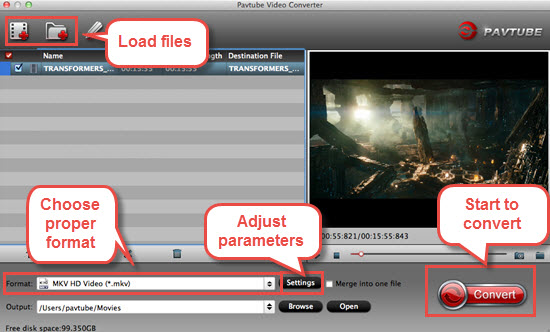
Here you need this Pavtube Video Converter for Mac which turns out to be the best iMovie to different formats converter. Simple and efficient tool as you can see from its multiple presets and powerful inner decoder. Just follow those steps and you can transcode iMovie files to various formats like WMV, FLV, MKV, VOB, etc. Plenty of devices are also supported by this converter which can free you from the limitation of iMovie default exporting options.
Step 1. Load iMovie project files to the program.
Free download this converter on your mac and load your files by clicking "File";>";Add Video/Audio";.

Step 2. Choose the format you want to export like WMV, FLV, MKV, VOB, etc.
Step 3. Click "Convert" to start your conversion.
Tips:
Some users may encounter "unidentified developer";, don't worry, just follow these steps and everything will be OK.
1. Launch System Preferences from the Apple menu
2. Choose "Security & Privacy" and then click the "General" tab, followed by clicking the lock icon in the corner to unlock the settings
3. Look for "Allow applications downloaded from" and choose "Mac App Store and identified developers"
4. Accept the security warning and allow
5. You can now launch any app from any location or developer
If you worry about this may make your Mac vulnerable, just switch back to the original settings for sure.
Upload iMovie project online
Under "Share" option, you can upload your files to YouTube, Facebook, Vimeo, etc. This is very convenient for sharing videos online with your friends and families.
Step 1. Chose a movie to upload and open YouTube sharing window
Choose a completed movie you want to upload by clicking on it in the Project Library. Go to the main menu and choose "Share";>";YouTube" to open the YouTube upload menu.
Step 2. Fill in YouTube account and other information
Then click "Add" button to add your YouTube account and fill in your YouTube account name and password. Other information like title, description, tags, category, etc for you to fill in, those will make your videos more easily to be found by others.
Step 3. Select the publish size and share iMovie videos to YouTube
Here are several options for you to choose, such as Mobile, Medium, Large, HD 720p, HD 1080p. If you pursuit the best quality for your files, you can choose HD 1080p, but since the high Size (pix), the uploading progress will be much longer.
Tips:
Some users found that when they finish uploading their files on YouTube, Vimeo, Facebook, etc and want to playback, the picture is choppy when they pull the progress bar. In order to avoid this situation, you can still ask Pavtube Video Converter for Mac for help.
Just load your files into this converter, and choose "HD Video";>";H.264 HD Video (*.mp4)" as the output format. This codec will make your videos not only compatible with almost all platforms but also output as H.264 High Profile to keep the sharp quality.
For solving the choppy and blur picture problem, just click "Settings"; to downscale your file size which will tackle this problem.


