Gameplay recording is quite popular on YouTube and FaceBook. These gamers record and share their gameplay videos to YouTube and FaceBook to grow their audience, show of their skills or review a newly released game. If you’re looking to record Xbox One, PS4 or other game console gameplay videos for uploading to Youtube, Facebook, here is the method you can try. Besides, you also can learn how to convert and compress Gameplay videos to Youtube, Facebook when the Gameplay video is not supported by YouTube/FaceBook in this article.
Part 1: Top Screen Recording Software For Recording Gameplay Videos
Screen capture software is such a kind of tool for anyone who want to take screenshots or record video from their computer screen such as the Gameplay. Below are the top screen recorders to meet your needs to record Gameplay on Windows. (You May Need Best Paid and Free Screen Recorder for Mac)
Top 1 Gameplay Video Recorder: Fraps
Fraps is the most popular choice for recording gameplay, because it has a simple UI, and can display your game’s benchmark and adjust your video output’s framerate and size.With Fraps, you have a few tools to use as you capture your game footage. You can manage screenshots, benchmarks, and audio and video recording through the user interface.
Top 2 Gameplay Video Recorder: Action!
Action! is one of the best Screen Recording Software and Gameplay Recorder software. Action! screen recorder allows streaming and real-time recording of Windows desktop in a superb HD video quality. With Action! you can record and stream your gameplay, web player videos, record music, capture screenshots, add webcams, microphone commentary and more!
Top 3 Gameplay Video Recorder: OBS
OBS Studio (also known as Open Broadcaster Software, or OBS) is a screen-casting and live-streaming software available across multiple platforms including Mac OSX, Windows and Linux. Boasting features typically only found in commercial screen recording apps, OBS also provides one of the simplest workflows with an intuitive and easy-to-learn interface that makes recording and streaming a breeze. It's also totally free and open-source.
Apart from these top 3 Gameplay video recorder, you can also can try CamStudio, Ezvid, Bandicam, D3DGear, BSR Screen Recorder to screen cast your Gameplay for posting onto YouTube, FaceBook and other video sharing sites.
Part 2: Convert, Edit and Compress Gameplay videos to Youtube, Facebook
Normally, many video recordings software allow users to edit and upload the Gameplay to YouTube directly. But there are still many Gameplay recorders that don't have the feature. What's more, some software will screen cast Gameplay and save the recordings in a format that YouTube and FaceBook don't support. In this case, you perhaps need to convert the recordings to MP4 and other YouTube and FaceBook supported video formats. Or the Gameplay recordings are too long or too large for YouTube and FaceBook and need to trim and compress. You need a video converter or video editor to help you reach that.
For Windows users, Pavtube Video Converter Ultimate is deserved to try. It is a video converter, as its name shown, but also a video editor with some simple and essential video editing functions. With it, you can easily transcode your Gameplay recordings to YouTube and FaceBook playable video and audio format such as MP4, WebM, MOV, etc encoded with compatible video and audio codec. You can trim the Gameplay recordings length to meet the YouTube and FaceBook supported video length and size requirement. You also can compress Gameplay videos by adjusting video resolution, bitrate to reduce the Gameplay videos size.
To make your Gameplay videos different, you also can add some subtitle to narrate the game or your skills and add a text/image/video watermark to your Gameplay videos. Aspect ratio is also supported to change in this video converter. If needed, you even can remove the audio in the Gameplay video or replace audio from it. Now, download it and try to convert and compress your Gameplay videos to Youtube, Facebook supported one.
Steps to Convert and Compress Gameplay videos to Youtube, Facebook
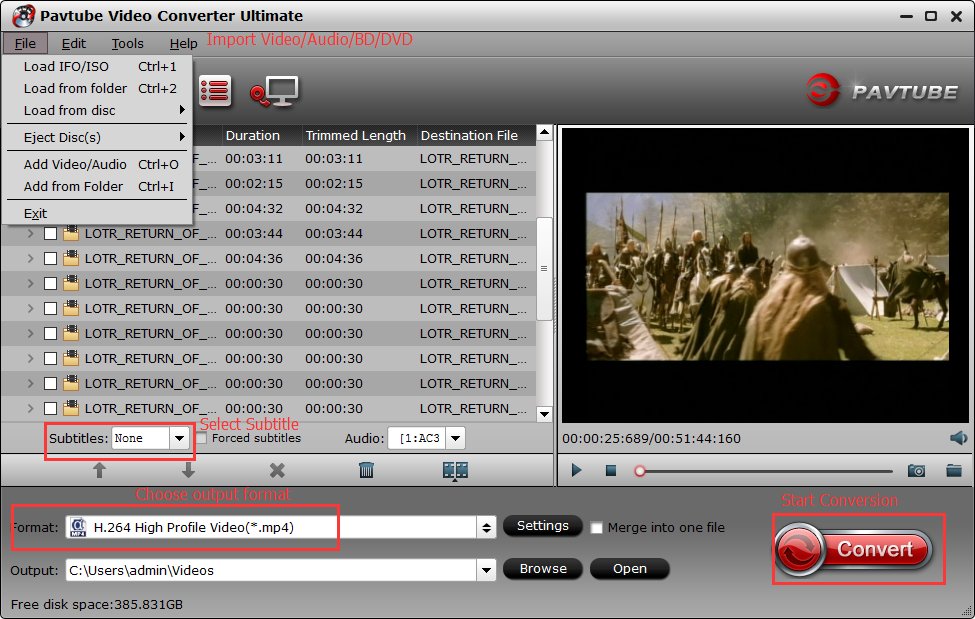
Step 1: Import Gameplay recordings
Start the Gameplay recordings video converter program on your computer, click "File" > "Load Video/Audio" or "Load from folder" button to import Gameplay recordings into the program. "Drag-and-Drop" and "Batch Conversion" features are also supported. If you loaded multiple Gameplay clips, you also can merge the video into a single one file.
Step 2: Output Youtube/FaceBook best uploading format
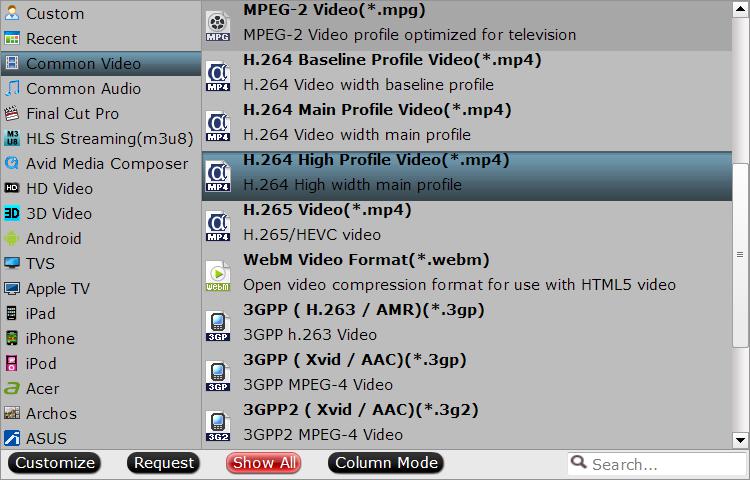
Click "Format" bar, from its drop-down options, choose YouTube and FaceBook compatible uploading format from "Common VIdeo" > "H.264 High Profile Video(*.mp4)". You also can choose other YouTube and FaceBook supported video formats such as HTML5 WebM.
Step 3: Compress Gameplay recordings
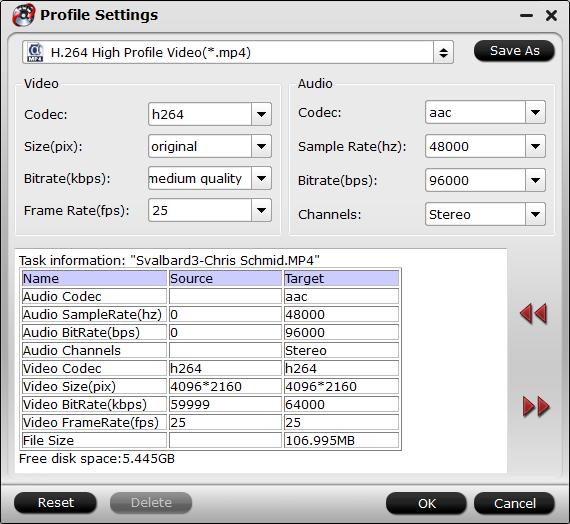
Click "Settings" to open the "Profile Settings" window, here you can adjust the output video codec, resolution, bit rate, frame rate and audio codec, bit rate, sample rate and channels to let the Gameplay recordings more fit in YouTube and FaceBook. To compress Gameplay recording, the most effective way is to reduce the video bitrate. You can change the bitrate value to see the target video size in the below chart.
Edit Gameplay recordings Before Export
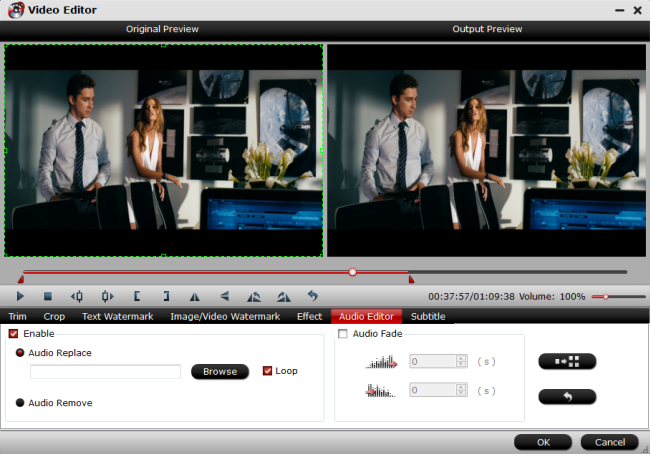
Trim Gameplay recordings: In “Video Editor” there are seven edit tabs: Trim, Crop, Text Watermark, Image/Video Watermark, Effect, Audio Editor and Subtitle. The "Trim" feature allows users to decide where to start and where to end when converting the Gameplay recordings clip, so that unwanted segments will be cut out after conversion.
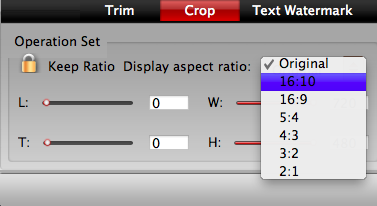
Crop Gameplay recordings: The "Crop" facility enables users to get rid of the black edges and unwanted area of the image.
Keep original Gameplay recordings aspect ratio and cropped aspect ratio
To keep original aspect ratio, users need make sure the "Display aspect ratio” and the "Size (pix)" in "Settings" option are all set as "Original". If you want to keep the cropped aspect ratio, Pavtube software offers several aspect ratios for you to choose from, including 16:10, 16:9, 5:4, 4:3, 3:2, and 2:1.
Add Watermark to Gameplay recordings: You can add text/video/image watermark to selected Gameplay recordings clip. You can either set parameters or drag the text on preview screen to set its location.
Audio Editor:You can either replace/remove original audio in the Gameplay recordings, or set audio fade in/out effects.
Subtitle: In this tab, you can add *.srt or *.ass/*.ssa subtitle-files to the Gameplay recording video as hard subtitles.
Step 4: Start to Convert and Compress Gameplay video
Clicking the Convert button on main interface, you can go to Conversion window to start to convert Gameplay recordings to YouTube and FaceBook. After the conversion, you can click Open output folder to popup output directory with the converted files.
How to Upload Gameplay video to YouTube or FaceBook?
Now, you can upload your Gameplau recordings to YouTube and FaceBook to show your skills and attract the audience.
Upload Video to YouTube
1. Sign into your YouTube account.
2. Click on Upload at the top of the page.
3. Before you start uploading the video you can chose the video privacy settings.
4. Select the video you'd like to upload from your computer.
Share Video on FaceBook
1. Click Share a photo or video at the top of your Page's Timeline.
2. Click Upload Photos/Video and select a video from your computer.
3. Write an optional update, then enter a Video Title and Video Tags.
4. Select a thumbnail by clicking the arrows on the preview of your video or click Add Custom Thumbnai


