Camtasia Studio MP4 importing issues?
I have the latest version of Camtasia, I want to import an MP4 but it says "Erro: No codc available to render this file...."Does anybody know which codec I should download? Thanks.
I can't import an mp4 into latest version of Camtasia. It's a short 8 second video. It says "cannot load file blabla.mp4. It is either an unsupported media type or required codecs are not found."

Edit MP4 with Camtasia Studio
Why can't import MP4 to Camtasia Studio?
Although both Camtasia for Windows/Mac has officially claimed its native import support for MP4 format files, however, it is well known that MP4 is multimedia container file formats which can be encoded with various different video and audio codec. In addition, there are also detailed information saying that Camtasia Studio for Windows only supports to import MP4 files encoded with H.264/AVC at no more than 30 frames per second. As for Camtasia Studio for Mac, you are highly recommend to use QuickTime or mp4/h.264 (AVC) formats for importing. Therefore, if the MP4 files you try to edit with Camtasia for Windows/Mac are encoded with other unsupported codec such as MPEG-1, MPEG-2, MPEG-4 (A)SP, H.265/HEVC, VC-1/WMV, Real Video, Theora, Microsoft MPEG4 V2, MVC, etc, you will definitely fail to load them into Camtasia Studio.
Transcode incompatible MP4 for Camtasia Studio editing
If you are looking for a simple and workable solution to get the job easily done, you are highly recommended to perform a codec transcoding process. Here, you can download Pavtube Pavtube Video Converter Ultimate for Windows/Mac (reivew), which has media compatibility with Blu-ray/DVD and digital media in virtually any file format. With the program, you can comprehensively convert all the unsupported MP4 file listed above to Camtasia Studio most favorable H.264 editing codec. If your computer runs on a CUDA-enabled Graphics card, or an AMD graphics card with AMD APP technology, the H.264 encoding speed of Pavtube Video Ultimate can be accelerated up to 6x speed than before.
Adjust output frame rate
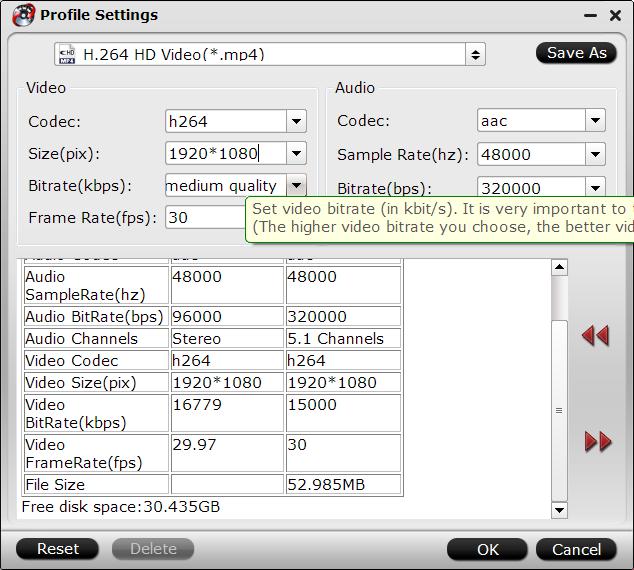
If the MP4 video is encoded with a frame rate that's larger than 30 frames per second, you can change the output frame rate in the program's profile setting to set the output video frame rate as no more than 30 frames per second. Besides the frame rate, you can also adjust other profile settings such as video codec, bit rate, resolution or audio codec, bit rate, sample rate, channels, etc according to your own needs.
Edit MP4 video with built-in editing tools
Apart from converting video for Camtasia editing, the program also acts as a perfect video editor alternative for Camtasia Studio. You can take good advantage of its built-in video editing tool to flip video horizontally or vertically, rotate video clockwise or counterclockwise to get it displayed in the right angle, trim or cut video to remove unwanted parts or segments, crop video to cut off unwanted black borders or area, personalize video with video/image/transparent text watermark, split large video into small parts by file size, count or length, merge separate video clips into one, adjust picture effect like brightness, contrast, saturation or apply special rendering effects like Gray, Flip Color or Aged Flim, etc to your video or add external SRT/ASS/SSA subtitles to videos.
How to Convert Unsupported MP4 for Camtasia Studio for Windows/Mac Editing?
Step 1: Add unsupported MP4 files into the program.
Run the program on your computer and click "File" > "Add Video/Audio" or "Add from folder" to add unsupported MP4 files into the program.

Step 2: Output Camtasia Studio for Windows supported editing formats.
From the pull down menu of "Format" , then you will be able to select Camtasia Studio best compatible editing formats "H.264 HD Video(*.mp4)" under "HD Video" main category.

Step 3: Adjust output video frame rate.
Click "Settings" to open "Profile Settings" window, here, you can change the output frame rate to less than 30fps from the "Frame Rate(fps)" drop-down options, you can also change other settings according to your own needs.

Step 4: Edit mp4 files with built-in editing tools.
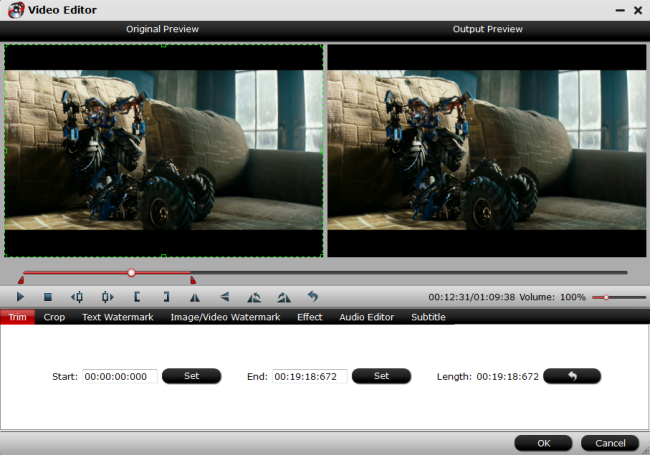
On the top tool bar on the main interface, click the pencial like icon to open "Video Editor" window, you can trim Blu-ray movies to remove the unwanted parts by setting the start and end time, crop to remove the black borders or unwanted area by dragging the dash line around the video frame, flip video, add text/image/video watermark, change video picture effect, replace/remove audio in video, add external subtitles, etc.

Step 4: Start the final conversion process.
After all setting is completed, click right-bottom "Convert" button to begin the unsupported MP4 video to Camtasia Studio best compatible editing format conversion process.
When the conversion is completed, you will have no problem to import any MP4 to Camtasia Studio for the best post editing workflow.


