For many people who have tried media players throughout their computing career, Apple QuickTime has always been the most reliable. With QuickTime 7 Pro, media format is not a big issue any more and it becomes effortless to edit, create stunning videos, build personal video library and record podcast. However, QuickTime cannot handle every kind of format, and there are still several video formats that QuickTime 7 Pro fails to convert. Apple has released a new Mac operating system: Mac OS X Yosemite. How to install QuickTime 7 Pro in OS X Yosemite? And is there an alternative solution for QuickTime 7 Pro regarding video conversion?

Part I. Install QuickTime 7 Pro for OS X Yosemite
QuickTime 7 Pro is more professional than QuickTime 7. To upgrade QuickTime 7 Pro or install QuickTime 7 Pro on Mac OS X 10.10 Yosemite, what you need is QuickTime 7 player installed in advance, and a QuickTime 7 Pro registration code.
Step I. Download QuickTime 7 player
Download QuickTime 7 player on Mac OS X Yosemite from Apple official site.
Step 2. Run QuickTime 7 player
In Finder choose Go > Utilities. Double-click “QuickTime Player 7” to open it. In QuickTime Player 7, choose QuickTime Player 7 > Registration.
Step 3. Enter the registration code of QuickTime 7 Pro
When the Registration window pops up, enter the registration code of QuickTime 7 Pro in the email sent by Apple online store. Learn more about the QuickTime 7 Registration code.
Part II. Convert Media Files with a Versatile Mac Video Converter
How to deal with those media files which cannot be converted with QuickTime 7 Pro? You’ll need an alternative solution – a more flexible and reliable video converter for Mac OS X 10.10 Yosemite. Pavtube iMedia Converter for Mac will be an all-in-one video converter capable of ripping any audio/video format as well as Blu-ray/DVD sources to your desired media format. You can also use this Mac video converter as a media player, for the preview window allows you to enjoy the video sources before conversion.
Step 1. Download and run video converter for Mac OS X Yosemite
Download the video converter for Mac OS X 10.10 Yosemite and launch it on Mac.
Step 2. Import audio/video files
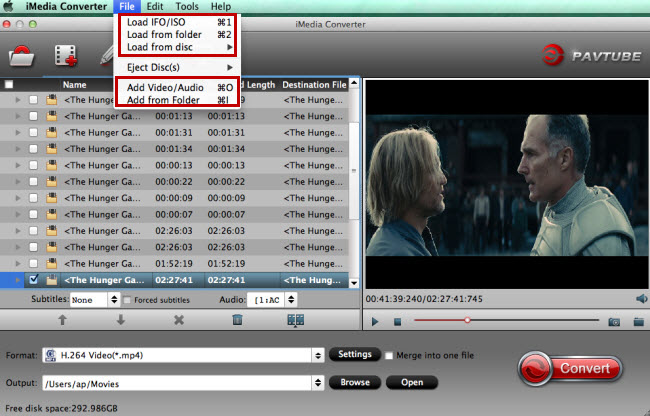
After the video converter for Mac OS X Yosemite has been running on your Mac, click “File” to add audio and video files, DVD and Blu-ray sources to it from these channels: “Load from disc”, “Load IFO/ISO”, “Load from folder”, “Add Video/Audio” and “Add from Folder.” To preview the video files, click the preview window on right side of the main UI, and this Mac video converter will play the videos automatically.

Step 3. Choose a proper output
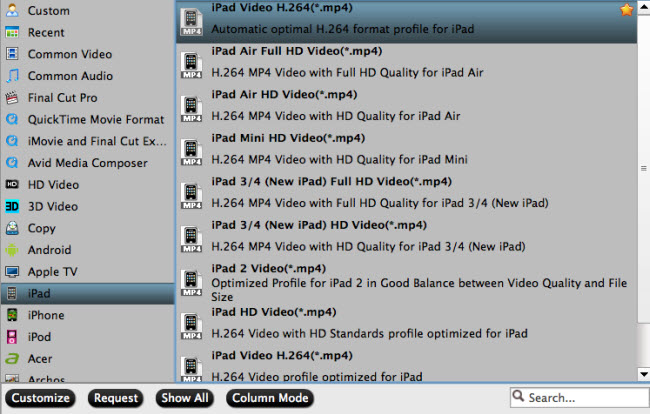
Click the format bar to select a video format compatible with your mobile device, editing software, media players or devices in your created home theater.

Step 4. Create stunning videos
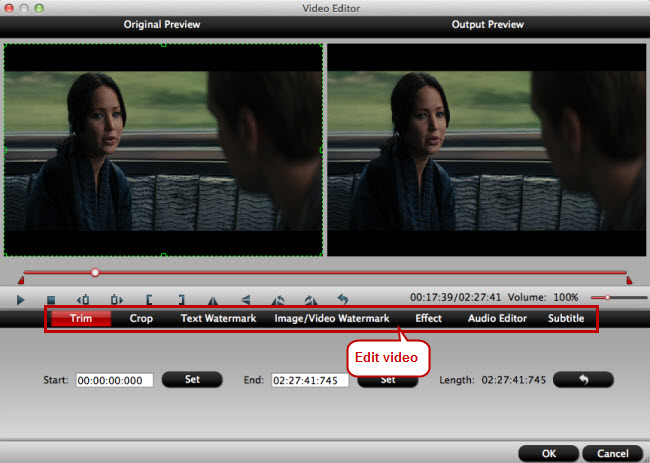
More than a Mac video converter, Pavtube iMedia Converter for Mac can also allow you to edit the imported video files as you like. Click “Edit” button to go to “Video Editor” interface. Then you can get the video clip you want by the trimming function, cut off black bars for better enjoyment, adding watermarks for fun and remarks, inserting subtitles for better understanding, adding special effects, etc.

Step 5. Convert videos to different formats
One click the big red button “Convert” on the main interface to realize video conversion on Mac OS X 10.10 Yosemite.
Step 6. Sync/transfer the converted videos
After conversion, you’ll get the converted videos in the output folder you set. You can enjoy converted videos according to your purposes. Here are several suggestions for you: Sync the converted videos to iPad, or iPhone; Stream the converted videos to an HD media player like Amazon Fire TV; transfer the converted video files to a hard drive for safer storage, etc.
Join our 2016 summer vacation promotion to enjoy up to 50% off discount coupon code for Blu-ray/DVD/video conversion tool.