Windows Media Center is now supporting watching/pausing/recording TV, playing any song in your media library as well as playing CDs and DVDs. As there are a variety of formats supported by Windows Media Center, you can play your DVD movies in this powerful media center.

However, you may come across DVDs that fail to be played by your Windows Media Center, and if your DVDs are not damaged, then don’t worry, and the main reason for this problem is that your DVDs are copy protected. How to realize smooth playback of every kind of DVDs in Windows Media Center? A DVD to Windows Media Center converter is the best solution as well as the smartest adoption. Pavtube DVDAid is just perfect for converting various DVDs to the video format compatible with Microsoft Windows Media Center.
Part I. How to convert DVDs to Windows Media Center supported video format?
Step 1. Load DVD
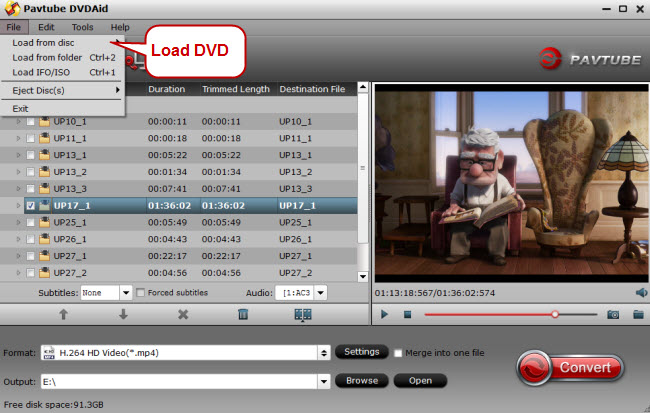
Run DVD to Windows Media Center converter on PC, and click “File” to follow “Load from disc” and find the DVD disc you put into the computer.

Step 2. Choose Windows Media Center supported video format
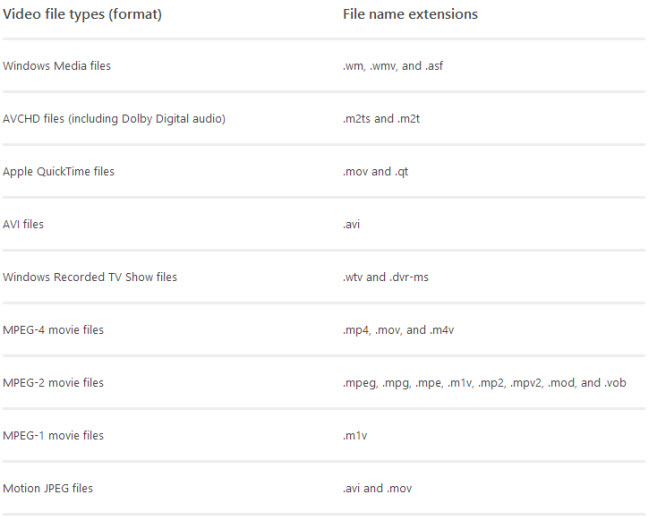
Before selecting the video format for Windows Media Center, please check Windows Media Center supported video formats listed below:

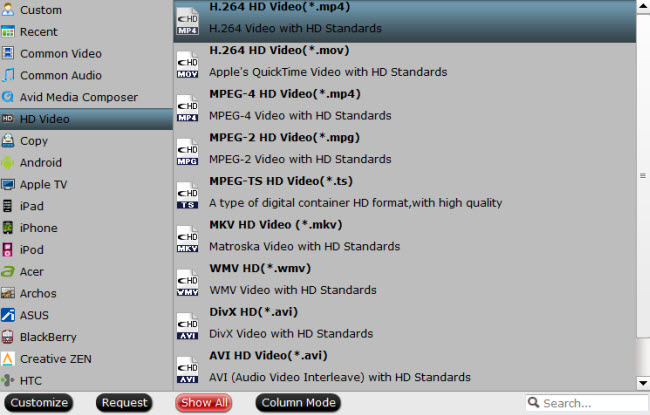
Then click the format bar under the video file list to find “HD Video.” Under “HD Video” item please find the output video formats compatible with Windows Media Center according to the form listed above.

Tips:
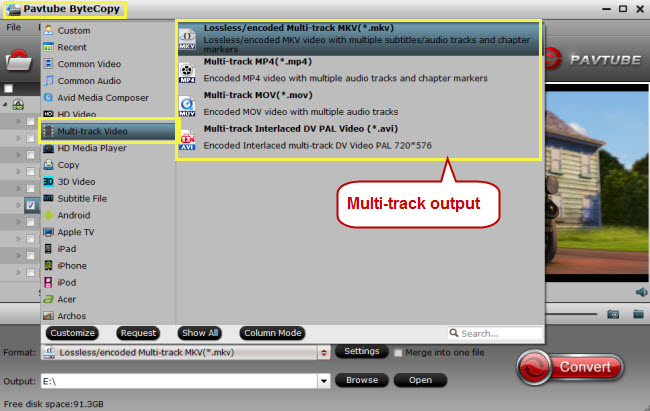
Though Windows Media Center can play a majority of DVDs, Blu-ray discs are not supported by this media center. If you got Blu-ray discs, Blu-ray playback in Windows Media Center can also be realized, and what you need to do is download a Blu-ray to Windows Media Center converter Pavtube ByteCopy, this Blu-ray converter not only allows you to rip Blu-ray discs to video formats compatible with Window Media Center, but also preserve multiple audio tracks/subtitles as well as chapter markers.

Step 3. Convert DVD to Windows Media Center
After choosing the right video format for Windows Media Center, just click “Convert” on bottom right of the main UI to make DVD to Windows Media Center conversion happen.
Part II. How to import play the converted DVDs with Windows Media Center?
The first time you start your Windows Media Center, it will look for media files in Music/Pictures/Videos library.
Step 1.
Create a folder for the converted DVD movies.
Step 2.
Launch Windows Media Center, and choose “Tasks” menu to follow “Settings.”
Step 3.
Choose “Media Libraries” and “Videos” and then tap next.
Step 4.
Choose “Add Folders to the Library” to add videos and the click “Next.”
Step 5.
Choose “On This Computer” to import a local folder.
Step 6.
Select the folder where you save the converted DVD movies and check the box before the folder, and all the converted DVD movies/subfolders will be automatically added and tap “Next” to continue.
Step 7.
If the above process is correct, choose “Yes, Use This Location” and then tap “Finish” and the Windows Media Center will start importing all the converted DVD movies kept in the selected folder, after importing, the DVD movies will be shown in the video library of Windows Media Center.


