Just just a Google account, you will get full access to Google Drive. Google Drive gives a 15GB of free storage space for anything you upload to Drive including photos, videos, documents, photo files and more.
To upload Blu-ray to Google Drive, there are many things you should take into consideration. The first thing is that unlike other common digital formats, Blu-ray disc are usually secured with a special security encryption, you will need a special Blu-ray ripping tool to strip off this protection.

In addition, Blu-ray disc are also rather large file size, you will need plenty of free space on your Google Drive to save the files. Although you can get 15GB free online storage space to store your Blu-ray movies, but a conventional Blu-ray disc will contain 25GB per layer and 50 GB of dual layer. In addition, you will also need to share that 15GB with Gmail account, photos you upload to Google+, and any documents you create in Google Drive. Therefore, you can select certain of your favorite chapters of Blu-ray movies for uploading to Google Drive.
A number of software are available to let your rip protected Blu-ray movies to Google Drive with ease. Pavtube BDMagic(Get Mac version) can be a good option for the following reasons: perfect support for both 2D and 3D Blu-ray movies, rip copy protected Blu-ray for backing up to various cloud storage services including Google Drive, Dropbox, Microsoft OneDrive. Moreover, to output Blu-ray in small file size for uploading to Google Drive, the program enables you to select only your favorite chapters to backup. The built-in trim function also helps you to convert only your wanted parts of Blu-ray movies.
How to compress and upload Blu-ray movies to Google Drive Windows and Mac?
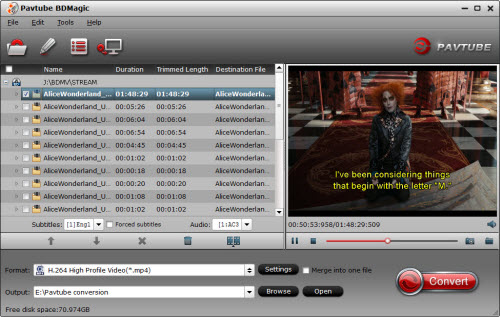
Step 1: Load Blu-ray disc movies.
Insert the Blu-ray disc to your Blu-ray disc drive that has been plug into your computer, click “File” > “Load from disc” to add Blu-ray Disc to the program.
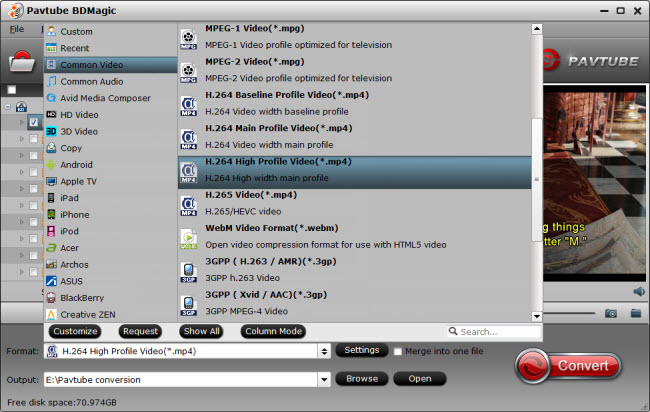
Step 2: Specify output file format.
Click “Format” bar, from its drop-down options, choose Google Drive readable format from “Common Video” profile list, here, you can choose to output “H.264 High Profile Video (*.mp4)” file format. You are also allowed to output other Google Drive supported format such as AVI, WMV, FLV, MOV, MTS, MPEGPS, 3GPP, WebM.
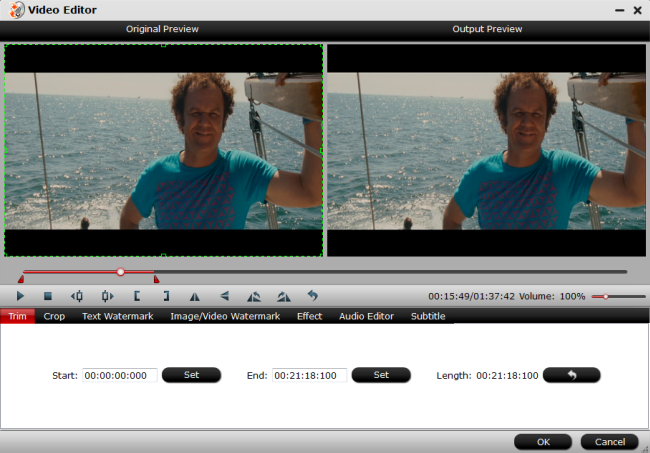
Step 3: Trim Blu-ray movies.
In the “Video Editor” window, go to the “Trim” tab, you can trim the video length by dragging the slider bar to set the starting time and ending time to short the length of the video.
Step 4: Start Blu-ray to Google Drive MP4 format conversion process.
If you have completed all the settings, your can start to rip/convert Blu-ray to Google Drive preferable format by hitting the right-bottom “Convert” button.
When the conversion is done, hit the “Open output folder” on the main interface to get the converted DVD files from the program. Then transfer and upload video files to Google Drive with the 2 ways offered below:
Drag and drop:
If you’re using the latest version of Chrome or Firefox, you can drag a folder from your desktop into Google Drive. You can also drag files directly into folders or sub folders.
Upload files using Google Drive
1. Go to drive.google.com.
2. On the left, click “New”.
3. Select “File upload”.
4. Select file you want to upload from. To select multiple files, press “Ctrl (PC)” or “Command (Mac)” and click all the files to upload.
5. You’ll see a box that shows the progress of your file upload. To open the file, click the file name. To close the box, click the “X”.


